
Alright, so you need to jack up your car. Maybe you’re changing a tire, maybe you want to get underneath and check something out. Whatever the reason, you’ve got to do it properly, otherwise you’ll end up with a car on top of you, and trust me, that’s not fun.
I’m going to show you exactly how I do it. I’ve been doing this for years, and it works on pretty much every car out there.
Read Also:
How to Change a Tire Without a Jack
Step 1: Loosen Those Wheel Nuts FIRST
This is the biggest mistake people make, so listen up.
Before you touch that jack, get your wheel brace out and loosen the wheel nuts. All of them. Do this while the car is still on the ground with the handbrake on. Why? Because once the wheel’s up in the air, trying to loosen those nuts becomes a nightmare. The car’s got nothing to grip against, and you’ll be spinning around like an idiot.
Just crack them off now. Takes two minutes. You’ll thank me later.
Step 2: Find Your Jacking Point
Here’s where most people mess up. They jack the car up anywhere, and then wonder why the metal gets all messed up.
Your car has specific jacking points. These are reinforced spots built just for this job. Look along the sill that’s the bit under your doors.
At the back: Look between the rear wheel and the bumper, right on that sill. You’ll see it’s been used before there are usually dents or marks where other people have jacked it.
At the front: Drop down from your wing mirror to your wheel. Look on the sill under the door. It’s right there.
These points have metal reinforcement going up through your car, so they can handle the weight. Everything else? Not so much.
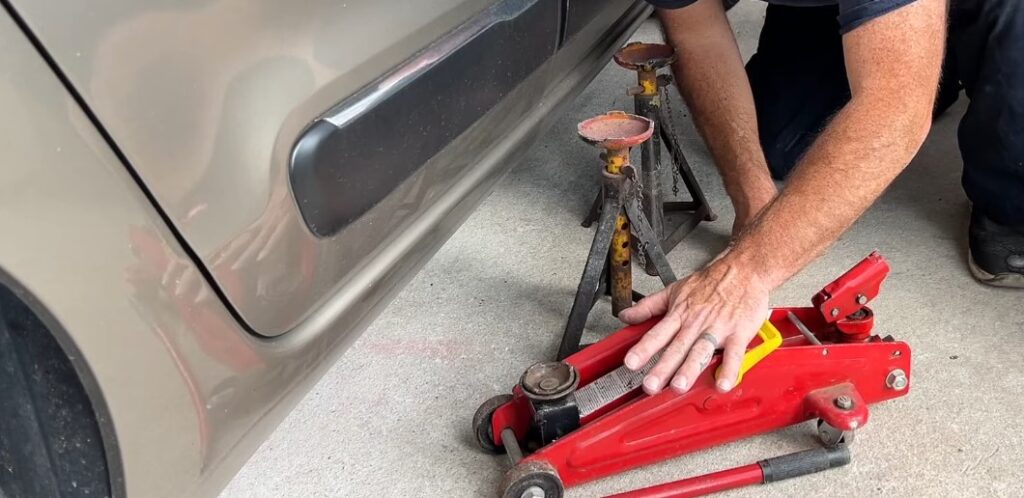
Step 3: Get Your Gear Ready
Before you start jacking, set out your axle stands. These are adjustable metal stands with pins they slide up and down so you can set them to whatever height you need.
I use a trolley jack, but you might have a scissor jack that came with your car. Either works fine. The axle stands are your safety backup. Never, and I mean never, leave a car sitting on just the jack while you work on it.
Step 4: Position Your Jack
Here’s a trick I use: I don’t jack right on the jacking point. I jack slightly to the side, on that lip of the sill. This spreads the load out a bit and means the jacking point itself isn’t taking all the punishment while you’re working.
Position your jack a little bit away from where you want the axle stand to go. This gives you room to slide it in underneath later.
Step 5: Jack It Up – Gently
Now comes the actual jacking. And here’s the thing go easy on it. Don’t whip that jack handle around like you’re wrestling a snake. Just steady, gentle pressure.
Lift it up slowly. You’ll hear it creaking a bit, maybe see the suspension moving. That’s normal. Keep going until your wheel clears the ground. It shouldn’t take long.
Step 6: Slide in Your Axle Stand
Once the wheel’s off the ground, here’s the important part: slide your axle stand underneath, right under that jacking point you identified earlier. Get it centered, lined up properly.
Now and this is crucial lower the car onto it slowly. Don’t just let it drop. Gently lower it down and let it settle into place. It’ll find its own spot.
Step 7: Test It Before You Relax
While your jack is still up, give the car a good shove. Push on it hard. If it’s going to slip, you want to know now, not when you’re underneath it.
If it doesn’t move? Good. You’re solid.
Step 8: Get That Jack Out of the Way
Once you’re sure everything’s stable, lower your jack all the way down and pull it out. Get it somewhere it won’t be in your way.
Now your car is sitting on that axle stand, resting on the proper jacking point. Your wheel will spin freely. You can get to work.
Why All This Faffing About?
You might be thinking, “Why not just leave it on the jack?”
Here’s my logic: When you jack it up on the sill, it’s only there for about 30 seconds to a minute while you’re getting the axle stand underneath. That’s it.
Then the car sits on the proper jacking point while you’re working could be an hour, could be all day. The jacking point is designed for this. The sill isn’t.
So yeah, it’s a bit more effort, but it’s the right way to do it. Your car won’t get damaged, and you won’t end up pinned under 1200 kilos of metal.
One More Thing
If you want to change a spare wheel as an emergency roadside fix, sure, leave it on the jack. That’s fine for 10 minutes. But if you’re actually working on the car? Get it on the stands. Every single time.
That’s how I do it, and that’s how you should do it.
Conclusion
Look, jacking up a car properly isn’t complicated. It just takes a bit of common sense and a couple of minutes of your time. Loosen the nuts first, find the right spot, use your jack carefully, get the axle stands in place, and test everything before you start working.
That’s it. That’s the whole thing.
The difference between doing it right and doing it wrong is the difference between a safe job and ending up in the hospital. So just do it right. Your car will thank you, and more importantly, you won’t end up injured.
I’ve shown you how I do it because it’s the way that makes the most sense to me. But the key principle is always the same: use the proper jacking points, and get your car on stands for any extended work. Everything else is just details.
If you’ve got questions or you do it differently, drop a comment below. I’m always interested to hear how other people tackle these jobs. And if you found this helpful, share it with someone who needs to know how to do this properly.
Stay safe out there, and happy wrenching!
Frequently Asked Questions
Q: Can I use the scissor jack that came with my car instead of a trolley jack?
A: Absolutely. A scissor jack works just fine. The method is the same—just take your time and don’t force it. Trolley jacks are a bit easier to use, but either one gets the job done.
Q: What if I can’t find the jacking point on my car?
A: Check your owner’s manual first—it’ll have a diagram showing exactly where they are. If you don’t have the manual, look along the sill under the doors. You’ll usually see marks or dents from previous jacking. If you’re still stuck, ask at a garage or check online forums for your specific car model.
Q: Do I really need axle stands, or is the jack enough?
A: You really need them. A jack can fail. A hose can burst, or you might bump it and knock it over. Axle stands are your insurance policy. They’re cheapusually £20-30—and they could save your life. Get them.
Q: How high should I adjust my axle stands?
A: Set them to a height where they’ll sit just under your jacking point when the car’s lifted. You want a little bit of clearance so you can get the car resting on them. Too low and the car won’t settle properly; too high and you’ll run out of jack lift. Play around with it—you’ll get a feel for it.
Q: Is it bad for my car if I jack it up in the same place every time?
A: Yeah, kind of. If you always jack on the sill in the same exact spot, you’ll deform the metal over time. That’s why I jack slightly to the side of the jacking point. Spreads the wear out a bit. But honestly, for occasional home maintenance, it’s not a huge deal.
Q: What should I do if the jacking point is already damaged or deformed?
A: Be careful. If it’s dented or really messed up, it might not support the weight properly. If it looks really bad, take it to a garage and let the professionals handle it. Don’t take chances with a damaged jacking point.
Q: Can I jack up two wheels at the same time?
A: Not with one jack, no. Jack up one wheel, get it on the stand, then move on to the next one. Trying to jack two at once is asking for trouble.
Q: How long can I safely leave a car on axle stands?
A: As long as you need to. Days, weeks, months doesn’t matter. As long as the stand is solid and positioned properly, the car will be fine. Just make sure you’ve tested it first.
Q: What if my car doesn’t have a proper jacking point?
A: Some older cars or specialty vehicles might not. Check your manual. If there genuinely isn’t one, you might need to take it to a proper garage. Don’t try to improvise a jacking point it’s not worth the risk.
Q: Do I need to use a wooden block under the axle stand?
A: It doesn’t hurt to put one down on soft ground, but on concrete or tarmac it’s not necessary. Some people do it anyway just for extra peace of mind. If you’re on gravel or soft dirt, yeah, use a block to stop the stand sinking in.

Mason Carter is an automotive technician helping drivers master tire maintenance with clear, practical guides. With years of hands-on experience, he breaks down complex tire care into simple, actionable steps for every skill level.
Through HowToChangeATires.com, Mason simplifies complex automotive concepts into clear, actionable guides that empower vehicle owners to take control of their maintenance. Whether you’re a first-time tire changer or looking to refine your skills, Mason’s detailed tutorials and expert tips ensure you have the knowledge and confidence needed for the job.
1 thought on “How to Jack Up a Car to Change a Tire (Step-by-Step) ”