How to Use a Harbor Freight Tire Changer: A Complete Beginner’s Guide
Changing your own tires can save you a lot of money. But if you have never touched a manual tire changer before, the process can look confusing at first. This guide breaks down exactly how to use Harbor Freight tire changer equipment step by step, so you can mount and dismount tires safely in your own garage.
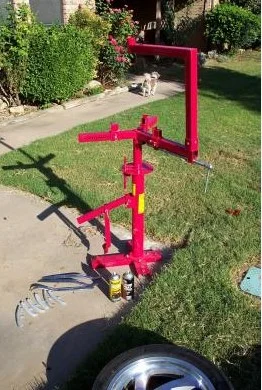
Whether you just unboxed the popular Harbor Freight model 69686 or you are still deciding if this is the right tool for your home garage tire changer setup, this guide covers everything: assembly, operation, safety, and the small tricks that competitor guides usually leave out like handling low-profile tires and protecting your rims from scratches.
Read Also:
How to Change a Tire
How to Change a Flat Tire
What Is a Harbor Freight Tire Changer?
A Harbor Freight tire changer is a manual, bench-mounted machine used to break the bead on a tire, remove it from the rim, and mount a new tire back on. It is not powered by air or electricity like shop-grade machines. Instead, you use your own arm strength and leverage to do the work.
This makes it a popular choice for:
- DIY tire changing at home
- Small home garage tire changer setups
- People who want automotive tire service equipment without paying shop prices
- Beginners looking for tire shop equipment for beginners
It is a budget-friendly alternative to a full pneumatic tire changer, and it works well for passenger car tire changer jobs on standard steel and alloy wheels.
Harbor Freight Tire Changer Setup Guide: Assembly Steps
Before you touch a tire, you need to put the machine together correctly. Following this Harbor Freight tire changer setup guide carefully will save you frustration later.
Step 1: Lay Out the Parts
Unbox everything and check it against the included Harbor Freight tire changer manual. You should have:
- Center post
- Post base and side bases
- Bead breaker handle and shoe
- Mount/demount bar
- Clevis pins, R-clips, bolts, washers, and nuts
Step 2: Build the Base
Place the center post diagonally across the post base, then bolt the two side bases onto either side until all the holes line up. Tighten everything with the hex bolts, washers, and nuts provided.
Step 3: Bolt It to the Floor
This step matters more than most people realize. A home garage tire changer that is not anchored down will wobble, tip, or slide when you apply force. Use the mounting holes to mark your floor, drill through a concrete surface at least 4 inches deep, and secure the unit with anchors. A loose changer is also a safety hazard, so do not skip this.
Step 4: Attach the Bead Breaker Arm
Slide the tire changer bead breaker arm into the bracket on the side of the center post and pin it in place. Then attach the bead breaker shoe to the handle using the second clevis pin. Choose the hole position that matches your tire size closer to the post for smaller tires.
Once assembled, your machine is ready for its first job.
Harbor Freight Manual Tire Changer: How to Use It Step by Step
Here is the full process for how to operate a tire changer machine from start to finish.
Step 1: Deflate the Tire Completely
Remove the valve core using a valve core tool so all the air escapes. Keep the valve stem tool handy — you will need it again later to reinstall the core after mounting.
Step 2: Apply Lubricant
Coat the tire bead generously with tire mounting lubricate/paste. This single step makes the biggest difference in how easy the job feels. Garage owners who have used this machine for years agree: skipping the lube is the number one reason people struggle or scratch their rims.
Step 3: Break the Bead
Set the tire on the post base with the rim pressed against the mounting tab. Position the tire changer bead breaker arm shoe against the rim edge, insert the mount/demount bar into the handle, and push down. This pops the bead loose from the rim. Repeat around the tire, and flip it over to break the bead on the other side too.
Step 4: Mount the Wheel Onto the Center Post
Remove the post cap and spider post, place the bare rim onto the center post, and thread the spider post and cap back on to lock it in place. Use the demount bar through the top of the post cap for extra leverage while tightening.
Step 5: Remove the Old Tire
Push the demount bar against the bead and use the post cap as a pivot point, walking the bar around the tire until the bead separates fully from the rim. Do the same for the inner bead, then lift the tire free.
Step 6: Mount the New Tire
Set the new tire on the rim, lubricate the bead again, and use the flat end of the bar to wedge it behind the rim edge. Work around the tire slowly. If the bead starts to seat too early, push down with your free hand to stop it from tightening up before you are done — this is the exact trouble spot most beginners hit.
Step 7: Seat the Bead and Inflate
Once the tire is fully mounted, use a tire pressure gauge or tire changer air pressure gauge to inflate it to the PSI listed on the tire’s sidewall. Never guess the pressure. Check carefully for leaks around the bead and valve stem before moving on.
Step 8: Reinstall on the Vehicle
Torque the lug nuts using a torque wrench for lug nuts to the manufacturer’s spec, and always support the vehicle safely with a jack and jack stands — never a jack alone.
Understanding the Key Parts of a Tire Changer
If you are new to this tool, it helps to know what each part does before you start.
- Tire changer clamps: Hold the wheel in place. On this model, the spider post and cap act as the clamp system.
- Tire changer mounting head: The part that guides the bead over the rim edge (on this manual model, the mount/demount bar does this job).
- Tire changer turntable: Rotates the wheel as you work the bead around it. Manual models like this one rely on you walking the bar around by hand instead of a motorized turntable.
- Bead breaker tool: The handle-and-shoe combo that pops the tire off the rim.
- Tire iron / tire spoon: A backup hand tool useful for stubborn spots the bar can’t reach easily.
Knowing these terms also helps if you ever compare this budget unit to a rim clamp tire changer or a swing arm tire changer, which use similar concepts but with powered turntables.
Tips From Experienced DIY Users
Real garage owners who have used this machine for years shared a few lessons that do not usually show up in the official manual:
- Brace the bead breaker arm if you plan to break down a lot of tires. The stock arm can bend under heavy, repeated force.
- Use plastic bar covers or wrap the demount bar end with a soft sleeve to avoid scratching alloy wheels.
- Push the opposite side of the bead toward the center of the wheel (the “drop center”) while working the last section over the rim. This is the trick that solves most “I can’t get the last 25% on” problems.
- Warm stiff tires slightly (sunlight or a warm room) before mounting; cold rubber is much harder to stretch.
- Clear at least 360 degrees of space around the machine. Tight garage corners make even small tires harder to handle.
Alloy Wheel Tire Changer Settings and Low-Profile Tire Changer Settings
This machine was not designed with a soft-touch clamping system, so a few adjustments in technique matter a lot here.
For Alloy Wheels
- Always use rim protectors or plastic sleeves on the bar.
- Apply extra lubricant since alloy rims tend to have a tighter bead seat.
- Work slowly rushing is the main cause of visible scratches.
For Low-Profile Tires
Low-profile tires have a shorter, stiffer sidewall, which makes them harder to stretch over the rim edge. If you’re wondering, can you change low-profile tires with a Harbor Freight tire changer — yes, but expect more effort. Use plenty of lubricant, push the bead toward the wheel’s drop center, and take breaks if the bar starts to feel stuck rather than forcing it.
Tire Changer Safety Tips
Safety should never be an afterthought. Follow these tire changer safety tips every time:
- Wear ANSI-approved safety goggles and heavy-duty gloves.
- Never use the machine on tires larger than its rated capacity.
- Always deflate the tire fully before starting.
- Keep the valve stem uncovered so trapped air can escape.
- Never work when tired, distracted, or under the influence of alcohol or medication.
- Keep bystanders and children away from the work area.
- Inspect all bolts and pins before every use a loose part can cause the bar to slip.
- Never hammer on the tire with the bar; this can damage the tire structure.
- Never over-inflate a tire past the sidewall’s rated PSI.
How Much Does a Tire Changer Cost?
Pricing varies depending on the type of machine:
- Manual entry-level changers (like this Harbor Freight model): roughly $40–$100
- Tire changer and balancer combo kits: $150–$400
- Full pneumatic tire changer shop machines: $500–$2,000+
For someone doing occasional DIY tire changing at home, the manual option offers the best value. Shop-grade machines only make sense if you are running a business or changing dozens of tires a month.
Manual vs Pneumatic Tire Changer: Which One Do You Need?
| Feature | Manual Tire Changer | Pneumatic Tire Changer |
|---|---|---|
| Price | Budget-friendly | Expensive |
| Power source | Your own strength | Air compressor |
| Speed | Slower | Much faster |
| Best for | Occasional home use | Frequent or shop use |
| Learning curve | Moderate | Easier once trained |
| Portability | Bolted to a fixed spot | Often larger, less portable |
If you only change a few sets of tires a year, a manual unit is usually the smarter buy. If you’re running through many wheels a week, a pneumatic tire changer will save your arms and your time.
What Size Tire Changer Do I Need for My Garage?
Most standard manual units, including the Harbor Freight 69686, handle tires from about 8 inches up to light truck sizes (7.5 x 16 inches), plus some flotation tires up to 12.5L16. If you regularly work on bigger truck tires, check the rated capacity before buying pushing a machine past its limit is both unsafe and likely to damage the equipment. For very small tires, such as those on wheelbarrows or small trailers, a mini tire changer is a better fit.
Frequently Asked Questions
Is a Harbor Freight tire changer good for beginners?
Yes. It’s a solid entry point for Harbor Freight tire changer for beginners looking to learn the basics without spending shop-level money. It does require more physical effort and patience than a powered machine, but with lubricant and the right technique, most beginners can mount a full set of tires within a few attempts.
Can you change low-profile tires with a Harbor Freight tire changer?
Yes, but it takes extra care. Low-profile tires have stiffer sidewalls, so use plenty of bead lubricant, work slowly, and push the bead toward the center of the wheel where the diameter is smaller to get the last section over the rim.
How long does it take to learn a tire changer?
Most people get comfortable within their first two or three tires. The first attempt is usually the slowest, often taking 30–45 minutes. After a bit of practice, a single tire swap can take as little as 10–15 minutes.
Does Harbor Freight tire changer work on alloy wheels?
Yes, but you need to be careful. Alloy rims scratch more easily than steel wheels, so always use a rim protector or plastic sleeve on the bar and apply extra lubricant while working.
How do I avoid scratching rims with a manual tire changer?
Use plastic or rubber bar covers, apply generous bead lubricant, and move slowly instead of forcing the bar. Rushing under pressure is the most common cause of rim damage.
Final Thoughts
A Harbor Freight tire changer is one of the most affordable ways to start doing your own DIY tire changing at home. It takes a bit of practice, some elbow grease, and the right technique — especially around lubrication and handling low-profile tires but once you get the hang of it, you’ll wonder why you ever paid a shop for basic tire swaps.
Follow the Harbor Freight manual tire changer how to use steps in this guide, keep safety gear on at all times, and don’t rush the last section of the bead. With a little patience, this budget tool can handle years of home garage tire changer jobs without ever needing a trip to the tire shop.

Mason Carter is an automotive technician helping drivers master tire maintenance with clear, practical guides. With years of hands-on experience, he breaks down complex tire care into simple, actionable steps for every skill level.
Through HowToChangeATires.com, Mason simplifies complex automotive concepts into clear, actionable guides that empower vehicle owners to take control of their maintenance. Whether you’re a first-time tire changer or looking to refine your skills, Mason’s detailed tutorials and expert tips ensure you have the knowledge and confidence needed for the job.