
Article Summary
Dealing with a TPMS warning on your dashboard can feel stressful, but replacing a tire pressure sensor is more manageable than most drivers think. This guide covers everything from spotting a failing sensor to installing a new one safely and correctly. You’ll find a clear tools list, step-by-step instructions for removal and installation, how to reset the TPMS system, and practical tips to keep your sensors working longer. Whether you’re chasing accurate tire pressure readings or just trying to silence that warning light, this guide has you covered, no fluff, just what actually matters for your vehicle and wheels.
Read Also: How to Change a Tire
Introduction to Tire Pressure Sensors
Your TPMS Tire Pressure Monitoring System plays a key role in your safety and fuel economy. These sensors read air pressure inside each tire and send that data as a digital number from the wheel sensor to your vehicle’s receiver. The moment pressure drops, you get an alert.
A failing TPMS sensor is a real risk driving on a low tire or flat tire without knowing leads to poor handling or a blowout. Underinflated tires create rolling resistance, hurting fuel efficiency, wearing tire shoulders, and in wet or icy conditions, reducing braking distance and traction.
If your TPMS warning light stays on after inflating tires, blinks for 60 to 90 seconds, or your scan tool shows “sensor not detected” with inaccurate tire pressure readings on the dash display, a dead internal battery is often the culprit. Battery failure, physical damage from potholes, road debris, corrosion, harsh winters, or sensor malfunction from internal defects are the usual reasons. Most last 5 to 10 years or 100,000 miles — always check your vehicle manual for model-specifics before a do-it-yourself fix.
What is a TPMS Sensor?
A TPMS sensor is a small electronic device sitting inside your tire, almost always mounted on the valve stem. Its job is straightforward: monitor the air pressure in real time, then transmit that data to your vehicle’s onboard computer. When pressure drops past a set threshold, it fires a signal to the receiver, which triggers the warning light on your dashboard your cue to check tires before things get worse. It’s a simple concept, but the tire pressure monitoring it enables is genuinely important. That built-in battery powering the electronic sensor is non-serviceable, which is why full replacement is eventually unavoidable.

When Do TPMS Sensors Need Replacement?
TPMS sensors don’t last forever. The general lifespan sits between 5 to 10 years or 100,000 miles, whichever comes first though that’s genuinely a rough ballpark depending on conditions. The most common reason for replacement is battery failure: the built-in batteries inside these units are simply not replaceable, so once the battery dies, the entire sensor must be swapped out. The indicator light coming on is usually your first real sign.
Beyond battery life, physical damage is surprisingly common potholes, sharp road debris, or even rough tire changes can knock a sensor out. Corrosion from long-term exposure, especially in regions with harsh winters and road salt, degrades contacts and housing over time. And like any electronic component, sensor malfunction from internal defects happens no warning, just a failed unit. When your warning light stays on and pressure checks out fine, replacement is almost always the answer.
Tools and Materials Needed
Getting the right setup before you start saves a lot of frustration. Here’s what you’ll actually need:
For the job itself: a car jack, jack stands, lug wrench, valve stem removal tool, tire bead breaker or tire changer (tire machine), the correct tire pressure sensor matched to your vehicle specifications, a torque wrench, air compressor, tire inflator, and a TPMS reset tool or relearn tool. If you’re using a non-OEM unit, a TPMS programming tool is essential. A socket set, tire valve core removal tool, valve core removal tool, tire iron, and optionally tire bead seal round out the list. For universal fitment, an Autel tire pressure sensor is a solid choice.
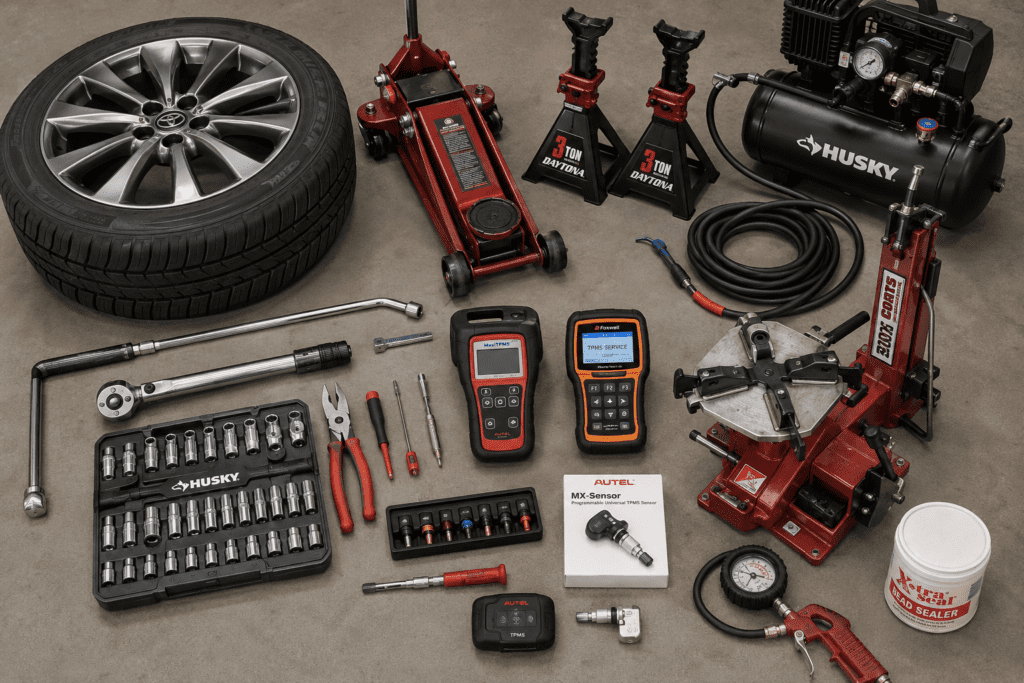
For safety: safety glasses, mechanic gloves, closed-toe shoes, and wheel chocks behind the stationary tires.
A few specs worth knowing ahead of time: sensor nuts typically torque to 35 to 80 inch-pounds or 4 to 7 Nm depending on brand. Your compressor should comfortably reach 165 psi for proper bead seating. Keep soap water nearby for lubrication during mounting. Note that some sensors mount on the valve stem while others attach 180 degrees from it using a metal strap checking this before disassembly saves time. Also have valve stem caps ready for reinstallation. A balancing machine is needed post-mount, and knowing your lift points prevents frame damage during jacking. Whether you use a T10 torx, standard screwdriver, or impact, having a wire wheel handy helps clean the valve stem hole area before installing fresh hardware. Always demounting and mounting with care around sensor placement 90 degrees, 150 degrees, and 180 degrees positioning references matter during this process, which the steps below explain in detail.
Step-by-Step Guide: How to Replace a Tire Pressure Sensor
Step 1: Preparation / Remove the Wheel
Park on level ground and engage the parking brake immediately. Place wheel chocks behind the opposite tires before anything else. With the vehicle still on the ground, use a lug wrench to loosen lug nuts not remove, just break the tension. Now use your car jack under the correct lift points to raise the vehicle, then secure it on jack stands. Never skip the stands. Once stable, remove lug nuts completely and take off wheel.
If you haven’t already confirmed your vehicle make, model, and year to source the correct TPMS sensor, do it now a universal TPMS sensor like an Autel unit works across many vehicles but still needs proper programming. Before breaking the bead, deflate the tire fully. When using the tire machine, always approach the bead 90 degrees from the valve stem and TPMS sensor location this protects the sensor from impact. Bead loose work near the sensor risks damage, so move deliberately and avoid damage at all costs.Remaining unused words: None Remaining word count: ~630
Step 2: Demount the Tire / Get to the Tire Pressure Sensor
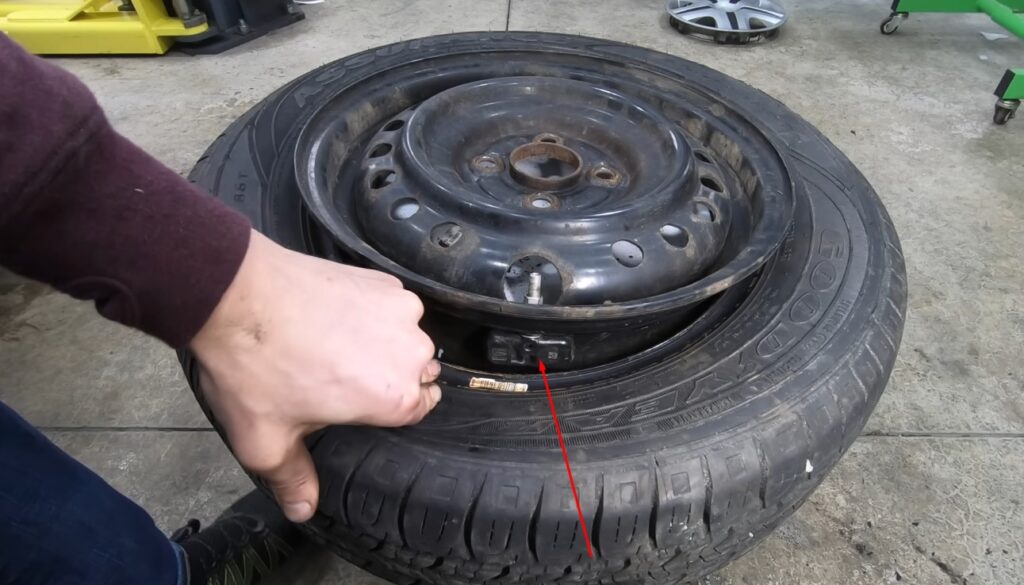
With the tire fully deflated, use the valve core removal tool to remove the valve core completely. A tire bead breaker or tire machine breaks the bead seal from the rim work away from the valve stem first. Once the bead is loose, position the wheel on the machine and clamp it down. Spin carefully and approach from the area away from the sensor.
Use soap water to lubricate the bead edge before levering. Work the tire off the rim by hand or with the machine arm, staying clear of the base of valve stem where the TPMS sensor sits. On steel wheels the bead tends to be harder than on aluminum take extra time. When the tire lifts away, the sensor should remain undamaged and visible. Inspect it carefully: check the sensor location, confirm it’s intact, and note if it’s mounted via the stem or with a separate clip. You may need a T10 torx to unclip it, depending on design. Use the valve stem removal tool and note the orientation before removing anything reinstalling incorrectly is a common mistake.
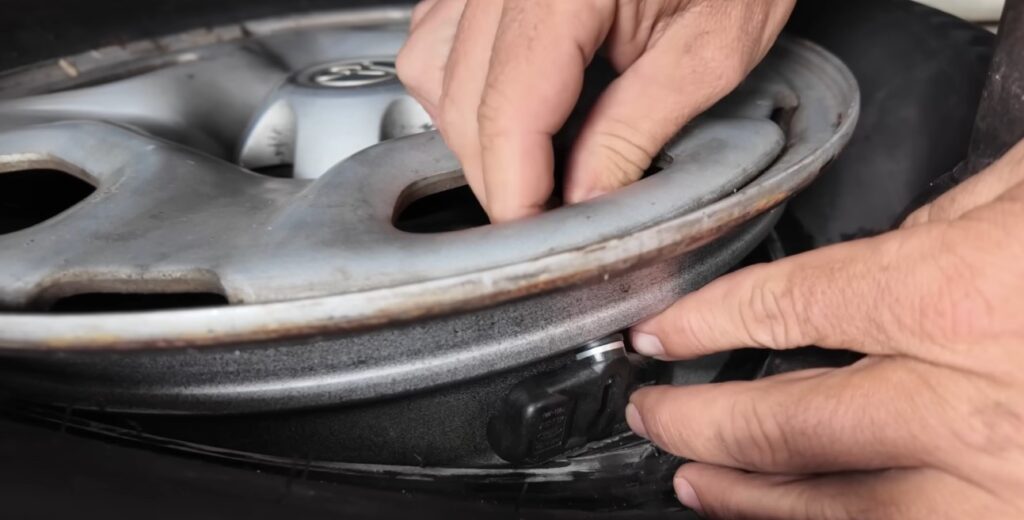
Step 3: Remove the Old TPMS Sensor
With access confirmed, use your T10 torx bit to unscrew the fastener or unclip the TPMS sensor from the wheel. Slide the valve stem removal tool into the valve stem hole and pull the stem free, keeping track of orientation and exactly how it was installed. Set the old sensor aside if it’s going to a shop for core comparison or programming reference; keep it intact. Remove the retaining nut carefully and note the sensor position relative to the rim. Being careful here and making sure you note orientation means the new install goes in right the first time.
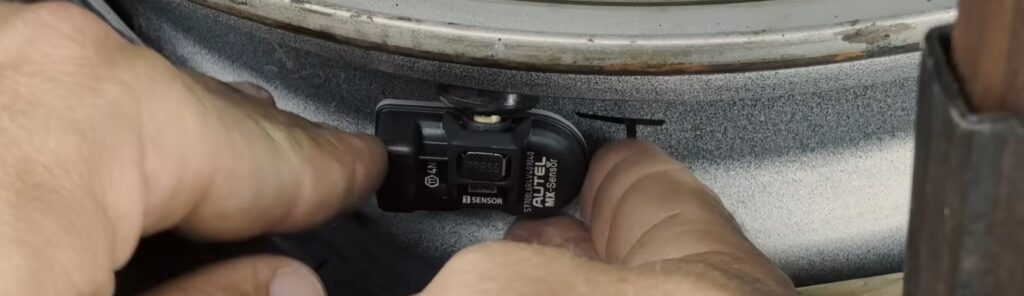
Step 4: Install the New Sensor
Drop the new TPMS sensor into the valve stem hole using the valve removal tool, matching the same position and angle as the old one. If it includes a new valve stem, seat it correctly before tightening. Hand-tighten the retaining nut first, then use your torque wrench to hit manufacturer specifications typically 35 to 80 inch-pounds or 4 to 7 Nm depending on your sensor brand. Don’t overtighten.
Make sure the sensor isn’t causing any sensor obstruction inside the rim. Tighten all screws and nuts to manufacturer torque. Apply a little soap water as lubrication when seating the bead. Check your tire if it’s directional, look for the arrow before mounting. Work in reverse order from removal: start the tire at roughly 180 degrees from the stem, work around, and let the valve stem be the last section to pop in. This protects the sensor and ensures correctly installed positioning every time.
Step 5: Remount the Tire / Reinstall the Wheel
Re-seat the tire bead onto the rim evenly. Before inflating, make sure the rim is clean wipe off any debris with a wire wheel if needed, and apply tire bead seal if the surface looks rough. Use the tire changer to fully mount tire, then inflate tire to manufacturer recommended pressure. Reinstall on the vehicle hub, hand-tighten all lug nuts, then snug them down with an impact wrench in a star pattern for even tightening. Remove jack stands, lower the vehicle, and finish with a torque wrench set to your manufacturer torque setting. Don’t skip balance tire take it to a balancing machine before driving.
Remaining unused words: None Remaining word count: ~110
Step 6: Reassemble and Reset the System
Reinstall wheel onto the hub, confirm lug nuts are torqued correctly with your torque wrench after lower vehicle. Turn the ignition on without starting watch the TPMS light. If it stays on, a relearn procedure is needed. Pull out your owner manual and follow the specific relearn method some require hitting a set driving speed, others need a TPMS scan tool to register new sensor data. Use a programming tool to sync the sensor to your onboard computer if it’s a universal unit. Follow programming procedures carefully. A TPMS reset tool handles most universal sensor setups. Once complete, relearn is confirmed and the system should clear. Double-check hand-tighten on caps and proper spec torque before calling it done.
After Replacement: Testing and Calibration
Once everything’s back together, grab your TPMS scan tool and verify all four sensors are communicating and transmitting accurate pressure readings. If one wheel isn’t registering, the first thing to check is whether you have the correct part number frequency mismatches between 315 MHz and 433 MHz units are a real issue that prevents TPMS module communication entirely.
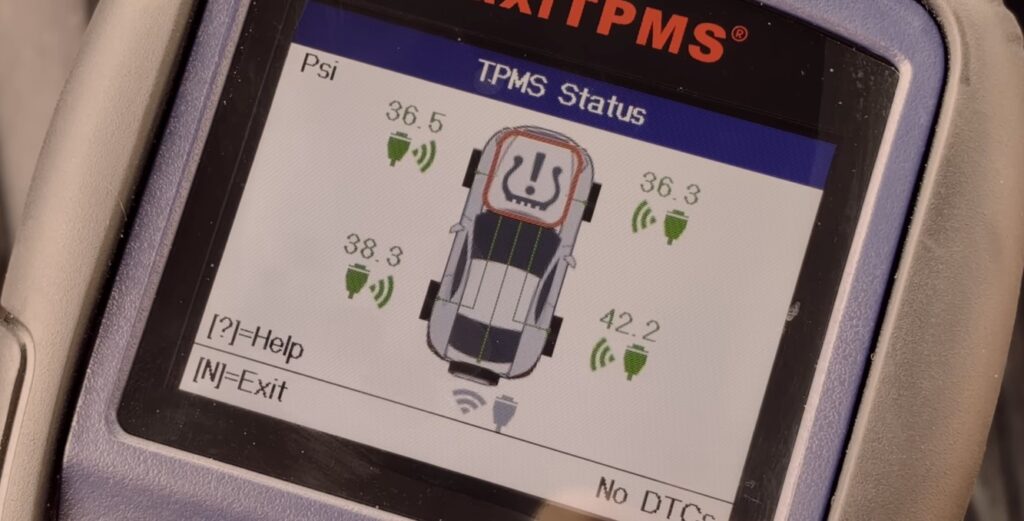
If the warning light stays on, try driving above 30 mph for 10 minutes many systems auto-relearn at speed. Some vehicles have a TPMS reset button located under the steering wheel. Others need a scan tool to push the relearn signal directly to the module. A faulty sensor, residual low pressure, or the need for a dealer visit covers the remaining edge cases. Confirm sensor transmission, check dashboard warning light status, and only sign off once everything reads working properly over a short distance test drive.
Cost of Replacing TPMS Sensors
Costs vary more than most people expect. OEM sensors from the vehicle manufacturer run $50 to $150 per sensor quality is reliable but the price reflects it. Aftermarket sensors from third-party brands are more affordable, usually landing between $25 to $75 per sensor, and many perform just as well for everyday use.
Labor cost for professional work typically adds $50 to $100 per sensor depending on shop rates and location. Then there’s programming cost getting the sensor programmed to communicate with your vehicle runs an additional $100 to $200 per vehicle at many shops, though some bundle it. Total cost for professional replacement lands between $70 to $250 per sensor all-in with parts and labor. DIY replacement slashes that significantly you’re mostly covering sensor cost plus a one-time programming fee if you need a tool. The installation itself costs nothing but time.
Tips for Extending Sensor Life
Tire pressure sensors are built to go 5 to 10 years, but how you maintain them determines whether they hit that mark or fall short. Checking pressure monthly with a reliable tire gauge is the simplest habit that pays off it keeps you aware before the TPMS light even triggers. Avoid tire sealants that aren’t labeled TPMS-safe; standard sealants clog sensors and cause failures that are entirely preventable. Always use valve stem caps they block debris from working into the valve core and causing slow leaks or leaking air at the stem.
Get sensors inspected any time you have new tires mounted shops sometimes overlook sensor condition during routine tire swaps. If your system needs a tire bead breaker or mounting machine and you don’t have access, DIY isn’t the right call hand it to a professional. Same goes if the TPMS light stays on after relearning or if the new sensor leaks at the stem. Tire shops and dealerships have the tools to program universal sensors, trace receiver faults, and handle tricky installations that a home setup can’t.
Maintenance extends lifespan and knowing your owner manual, understanding that some vehicles have 5 sensors including a spare tire sensor rather than just 4 sensors, and matching the right unit to your year make model prevents wasted effort. A local shop with proper software can diagnose sensor issues quickly if you’re unsure. And when in doubt, YouTube searches filtered by your exact year make model often surface model-specific tips that no generic guide covers.
FAQ’s
How do I know if my tire pressure sensor needs to be replaced?
If your TPMS warning light stays on even after inflating tires, a faulty sensor is likely the cause. A light that blinks for 60 to 90 seconds then goes solid, a scan tool showing “sensor not detected,” inaccurate readings on your dash display, or a confirmed dead battery inside the unit are all strong indicators that replacement is needed.
Can I replace a tire pressure sensor myself?
Yes, most do-it-yourself enthusiasts can handle it with the right tools and basic safety precautions. You’ll need a tire changer machine, TPMS programming tool, torque wrench, valve stem removal tool, jack, lug wrench, safety glasses, and gloves. A vehicle manual and a universal TPMS sensor make the step-by-step process straightforward. A tire bead breaker handles the toughest part. If you lack a mounting machine or issues persist after install, hand it to a professional at a tire shop.
How much does it cost to replace a TPMS sensor?
OEM sensors run $50 to $150 per unit. Aftermarket sensors from third-party brands come in at $25 to $75. Add labor cost of $50 to $100 per sensor if you go to a shop, plus a potential programming cost of $100 to $200 per vehicle. Total cost for full professional replacement lands at $70 to $250 per sensor. DIY keeps it to parts only just sensor cost which makes it a genuinely worthwhile option if you have access to the tools. Shop rates and location affect the final number considerably.
Do I need to reprogram a new tire pressure sensor?
In most cases, yes. After installation, the sensor needs to reprogram or go through a TPMS reset / relearn procedure so your vehicle’s system recognizes it. A TPMS scan tool or dedicated programming tool is used to sync the sensor ID to the onboard computer. Your vehicle manual will specify the exact method some cars handle it automatically after driving, while universal sensor setups almost always need a tool. Frequency matters too: 315 MHz and 433 MHz units aren’t interchangeable, and using the wrong one means the TPMS module never picks up the relearn signal. If the system still won’t register the new sensor, a dealer visit is the next step.
How long do tire pressure sensors usually last?
The standard range is 5 to 10 years or about 100,000 miles though that’s a ballpark, not a guarantee. Battery failure is the main reason they stop working since the built-in battery is not replaceable once it’s dead. Corrosion, physical damage from potholes or sharp road debris, and general wear all shorten that window. A monthly check with a tire gauge won’t extend the sensor’s life directly, but it keeps you ahead of issues and helps maintenance stay proactive. Once the indicator light comes on and pressure checks out fine, the sensor’s lifespan is likely up.
Additional Tips Unique Section
One thing that often gets skipped: systems differ based on vehicle manufacturer, so your year make model matters more than any generic advice. Always start with your owner manual it tells you whether you have 4 sensors or 5 sensors (some vehicles monitor the spare tire too). Built-in battery wear follows no fixed schedule 5 to 10 years is a rough ballpark and real-world mileage varies widely. If you’re unsure what’s triggering the warning light, a local shop with the right software can diagnose the issue in minutes. YouTube filtered by exact year make model search often turns up model-specific walkthroughs that generic guides miss. And keeping up with tire pressure monthly even manually in the old days style remains one of the simplest ways to stay ahead of sensor-related surprises.

1 thought on “How to Change Tire Pressure Sensor”